- Visibility 282 Views
- Downloads 78 Downloads
- Permissions
- DOI 10.18231/j.ijohd.2021.034
-
CrossMark
- Citation
Comparative evaluation of fine detail reproduction of six different die materials- An in-Vitro study
- Author Details:
-
Sattyam Wankhade
-
Jyoti Wankhade
-
Arun Khalikar
-
Pronoy Mukhopadhyay *
Abstract
Background: The precise outcome of any indirect casting, depends on the various procedures and materials involved through all its stages. The accurate fit against the prepared surface and the adaptation against the prepared margin depends on how accurately the tooth surface is captured in the impression made and how well it is reproduced in the die
Aim: This study aims to study and compare the property of fine detail reproduction amongst six die materials.
Materials & Methods: Over a pre-calibrated master die using custom tray, an impression record is made and poured using the six different die materials and the finest line reproduced is visualized under an optical fluorescent microscope at 50X magnification.
Statistical Analysis: The data obtained were statistically analysed using one-way ANOVA and subsequently assessed by post-hoc Tukey’s comparison to identify any significant differences between the groups.
Results & Conclusion: Epoxy resin die material (1.93 mm) showed a consistently excellent fine detail reproduction, followed by conventional Type V gypsum and Synthetic gypsum (15.91 mm), while Resin modified-Type IV and Type V and conventional Type IV gypsum dies (21.86mm) showed the least accuracy in fine reproduction.
Introduction
The 20th Century entailed the development and widespread evolution of Taggart’s ‘Lost-wax’ technique or more generically termed as the indirect casting procedure. The precision of castings procured through the indirect casting technique, lay its reliability on the various intermediary procedures and methodologies employed. The pattern of the prosthesis, thus fabricated, must anatomically and functionally simulate the structure being replaced.[1] Dies represent the prepared tooth structure over which the pattern is prepared and sculpted. Ideally, materials used to pour dies from the impressions of prepared tooth surfaces, must conform to certain requirements such as abrasion resistance, certain refractoriness, dimensional stability, adequate surface detail reproduction, transverse strength, to name a few.[2]
The more commonly used die materials are, Type IV and V gypsum products, epoxy resin dies and electroplated dies. Type IV gypsum products are an easily available, economically viable option, and are compatible with most impression materials.[3] They bear the disadvantage of poor abrasion resistance to stresses of laboratory manipulation for which hardeners and modifiers when added, may alter the dimensional accuracy of the same.[3], [4] Epoxy resin dies exhibit excellent surface detail reproduction and abrasion resistance, but display dimensional variations in axial directions.[3], [4], [5]
Fine detail reproduction ensures accurate simulated representation of the prepared tooth structure in the laboratory set-up.[6] It provides for a foundation that most closely resembles the tooth over which the restoration accurately adapts. This study aims to compare and evaluate the property of fine detail reproduction of 6 different die materials, namely epoxy resin, synthetic gypsum, resin modified Type IV and Type V gypsum; and conventional type IV and type V gypsum products.
Materials and Methods
Master die specification
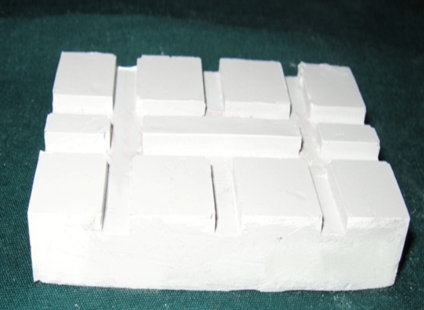
A 36 x 6 x 6 mm epoxy resin die was fabricated ([Figure 1]) to be used as the reference or master die. The die was engraved with 13 lines equidistant from each other, calibrating thicknesses as follows- 1.93, 3.69, 4.02, 5.52, 7.91, 15.90, 18.43, 21.86, 28.69, 42.84, 47.88, 50.01 and 54.32 µm. The die was mounted on a larger rectangular base that had channels cut into it at equal distances. Such a design of the base served dual purposes-firstly, it helped in the correct orientation of the custom tray; and secondly served as an escape way for the excess material as the tray was seated while making the impression.
The resin die was allowed to stabilize for 3 months after it was prepared. The distance between two points on either end of the die where the midline intersected with the thicker top and bottom lines was designated as the reference distance. At the end of three months, this distance was measured using the stereo microscope and recorded. One month later, the distance was measured again. The study commenced only after a comparison of both values showed no difference between them. This distance was measured again, during and after the conclusion of the study. It was found that the reference distance remained unchanged at all times.
|
Material |
Material Code |
Trade Name |
Manufacturer |
Place |
W/P Ratio |
Color |
|
Type IV Gypsum |
IV |
Master Die Peach |
IGC Technologies |
Milwaukee |
23ml/100g |
Peach |
|
Type V Gypsum |
V |
Master Keen Green |
IGC Technologies |
Milwaukee |
21ml/100g |
Green |
|
Resin Modified Type IV Gypsum |
RR IV |
Resin Rock |
Whip Mix Corp |
Louisville |
20ml/100g |
Grey |
|
Resin Modified Type V gypsum |
RR V |
Resin Rock XL5 |
Whip Mix Corp |
Louisville |
20ml/100g |
Blue |
|
Synthetic Gypsum |
S |
SynaRock |
Dental Future Systems (DFS) |
Reidenburg, Germany |
19-20ml/100g |
Beige |
|
Epoxy Resin |
E |
Die Epoxy 8000 |
American Dental Supply, Inc |
Easton |
1:6 by volume (hardener: resin) |
Grey |
|
Variable |
Smallest line reproduced |
Mean |
Standard Error of Mean |
Standard Deviation |
Median |
|
IV |
21.86 mm |
6.40 |
0.22 |
0.70 |
6.50 |
|
V |
15.91 mm |
7.80 |
0.13 |
0.42 |
8.00 |
|
RRIV |
21.86 mm |
5.90 |
0.18 |
0.57 |
6.00 |
|
RRV |
21.86 mm |
5.90 |
0.10 |
0.32 |
6.00 |
|
S |
15.91 mm |
7.80 |
0.25 |
0.79 |
8.00 |
|
E |
1.93 mm |
13.00 |
0.00 |
0.00 |
13.00 |
|
Source of variation |
Degrees of Freedom |
Sum of Squares |
Mean Square |
|
Factor (between groups) |
5 |
362.20 |
72.44 |
|
Error (within groups) |
54 |
15.40 |
0.29 |
|
Corrected Total |
59 |
377.60 |
|
|
F (variance ratio) =254.01 |
P < 0.0001 |
||
|
S = 0.5340 |
R-Sq = 95.92% |
R-Sq(adj) = 95.54% |
Preparing test samples
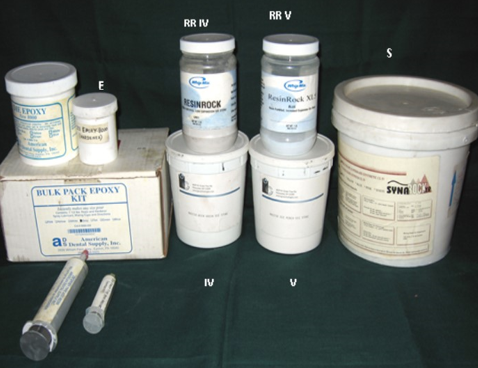
The materials to be tested were grouped (depicted in [Table 1]) with each having 10 representative samples to study, making it a total of 60 samples. The following groups of materials ([Figure 2]) were used to prepare the samples for the study-
Type IV gypsum (Master Die Peach, IGC technologies
Type V gypsum (Master Keen Green, IGC technologies
Resin Modified Type IV gypsum (Resin Rock, Whip-Mix Corp
Resin Modified Type V gypsum (Resin Rock XL5, Whip-Mix Corp
Synthetic gypsum (SynaRock XR, Dental Future Systems
Epoxy resin (Die epoxy 8000, American Dental Supply
Custom tray fabrication
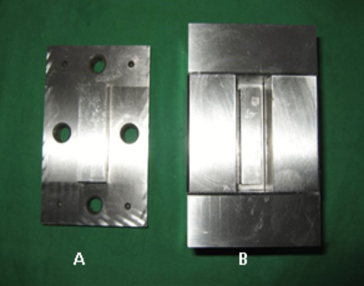
Auto-polymerizing acrylic resin (DPI, India) was used to fabricate the custom trays. A 7-part stainless steel master mold ([Figure 3]) was fabricated to construct custom trays of uniform dimensions. The master mold was fabricated in such a way that trays made from it had a uniform 2 mm of resin thickness as well as a uniform 2 mm space for the impression material. Monomer and polymer in a ratio of 2.4: 7 (by volume) were mixed in a ceramic bowl and carefully poured over the mold covered by petroleum jelly lubricant, so as to avoid air entrapment and allow retrieval of the tray. After 30 minutes, the components of the mold were separated to obtain the resin custom tray. The mold was cleaned of any remaining resin material and lubricated before pouring another mix of resin for the next custom tray. Once the tray was obtained, any excess resin flash was removed and escape holes were made. Six escape holes were made in the tray to allow excess impression material to flow out. All holes were made equidistant from the edges of the resin tray; two along the length of the tray and one along its width. The trays were then stored for 2 weeks to allow the dimensions to stabilize.
Impression making
A thin layer of universal tray adhesive (Universal VPS adhesive, GC America Inc, Alslip, Illinois) was painted onto each tray and allowed to air dry for 10 minutes. The impressions of the master die were then made in a low viscosity addition polyvinyl siloxane impression material (Exaflex, GC America Inc, Alslip, Illinois)
Sample preparation
The materials were proportioned according to the manufacturer’s specifications.
Gypsum products
For all gypsum-based products, distilled water was measured in a graduated cylinder and poured into a bowl that had just been rinsed with distilled water. The appropriate quantity (50g) of powder was weighed (A&D electronic analytical balance, ER — 180A, Least Count 0.0001g, A&D Company Ltd, Tokyo, Japan) and sifted into the bowl of water and hand mixed for 60 seconds. The impressions were then carefully poured under vibration, using a mechanical vibrator (Unident Industries India, India). All the samples of the gypsum-based products were separated from the impressions 30 minutes after they were poured. The free surface of the specimens was ground flat and parallel to the opposite impression surface and finished up to 1000 grit SC paper (Silicon Carbide paper, John Oakley & Mohan, India).
Epoxy resin product
Epoxy resin and resin hardener were drawn up to the third marking in each of their respective syringes. Both materials were syringed into a clean disposable plastic cup and mixed for 60 seconds with a clean, disposable wooden spatula provided by the manufacturer for this purpose.
The impressions were then carefully poured under vibration, using a mechanical vibrator (Unident Instruments India, India). All the samples of the epoxy resin product were separated from the impressions 3 hours after they were poured. The free surface of the specimens was ground flat and parallel to the opposite impression surface and finished up to 1000 grit SC paper (Silicon Carbide paper, John Oakley & Mohan, India).
Testing apparatus
The testing apparatus consisted of an optical (fluorescent) microscope (Leica, Reichert polyvar 2 with an image analysing software) at 50X magnification, to a resolution of 0.1mm and a stereo zoom microscope (Leica, MZ 12) with an image analysing software at 15X resolution.
Testing procedure
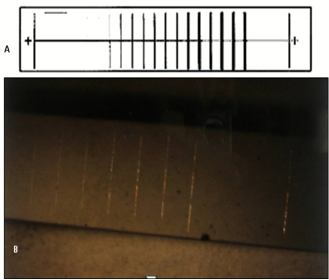
After 24 hours, each of the 60 samples were examined under the stereo zoom microscope (Leica, MZ 12) with an image analysing software at 15X resolution with low angle lighting. The number of lines that were discernible on the reproduced dies ([Figure 4]) were counted. At least 90% of the groove had to be replicated to count it as being present. The interpretation was made, based on the dimension of the narrowest line, thus counted.
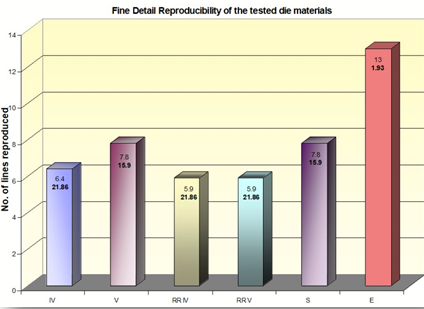
Results & Statistical Analysis
The mean values for each representative group have been depicted in [Table 2]. Epoxy resin dies exhibited the best results (narrowest dimension recorded=1.93µm) and also consistently replicated all the lines as is apparent from the low deviation (SD=0.00) amongst its samples. This was subsequently followed by conventional type V gypsum and synthetic gypsum (narrowest dimension recorded=15.91µm), displaying an average value. Type IV gypsum and resin modified gypsums (type IV and type V) displayed the poorest ability to replicate fine detail (narrowest dimension recorded=21.86 µm).
The data obtained were statistically analysed using one-way ANOVA and subsequently assessed by post-hoc Tukey’s comparison to identify any significant differences between the groups. All hypothesis testing was performed with experiment-wise error level (ɑ) at 0.05. The results of the one-way ANOVA ([Table 3]) indicate a statistically significant difference amongst the means of different groups (p<0.0001) and subsequently the Tukey’s comparison test confirmed the statistically significant differences between individual pairs of the groups.
Discussion
One of the factors determining the accuracy of a restoration fabricated using the indirect technique, is the fine detail reproduction of the die over which its pattern is carved.[7] Hence, the fit and functional success of a cast dental restoration depends on how well the die reproduces details as fine as the finish line and contours of the prepared tooth.[8] A die with precise reproducibility has potential to develop a margin for the restoration that lies in more intimate contact with the finish line of the prepared tooth.
Precision of the working cast, however, depends on the quality of impression material, the die material and the interaction between the two products.[9] The compatibility between the die materials and impression materials have been extensively studied.[9], [10], [11], [12], [13] The die materials evaluated for fine detail reproduction in this study were found to be compatible with the impression material that was used to record the lines scribed over the master die.
Previous studies have validated the methodology employed to study detailed reproduction of surfaces using various other die materials. Toreskog et al, employed Knoop indentations that ranged from 1 - 14mm in depth and 32mm — 422mm in length to measure the ability of different die materials to replicate fine detail.[14] Derrien et al., used grooves ranging from 1mm - 46mm to test for fine detail reproduction. They also employed scanning electron microscopy (SEM) and 2-dimensional profilometry as a means of evaluating the details reproduced by the different die materials.[15] The tracings obtained for the gypsum material (type IV) were irregular and could only be interpreted when the groove depth became approximately 15mm. The deepest grooves were also found to have not been replicated in their entirety. The tracings for the epoxy material on the other hand showed a suitable reproduction of all grooves including the minute ones and were comparable to the calibration model.[15] Duke et al., used grooves of the order of 1mm — 56mm to evaluate fine detail reproduction using an optical microscope with reference to a master die the technique and methodology of which was very similar to that formulated for this study.[16]
In this study, the results generated were consistent with the previous studies proving the exceptional surface reproducibility of epoxy resin dies.[17], [18] The epoxy resin dies not only duplicated the narrowest groove (1.93µm) with adequate precision but also consistently did so amongst all its samples. Parallelly, the lines were also easy to visualize under the microscope. Scanning electron microscopic studies have proven the low porosity range and surface reproduction of up to 2 µm for epoxy resin dies.[15] The size and irregularities of the gypsum crystals preclude gypsum- based products from capturing details at the level that epoxy resin die materials are capable of reproducing,[3], [4], [5], [6], [7], [8], [9], [10], [11], [12], [13], [14], [15] Photomicrographic studies of conventional Type IV die stones have shown that the hemihydrate powder (without water) consisted of angular irregularly shaped fragmented particles that ranged in size from 1 – 25 mm. As the reaction with water proceeds, these hemihydrate crystals result in the nucleation of numerous particles less than 1 mm in size. These particles continue to grow in size as the reaction advances. The original particles almost completely disappear by 60 minutes and the growing dihydrate crystals interdigitate with one another in the form of a mesh.[19], [20] The scanning electron microscopic examination of set gypsum revealed entanglement of gypsum crystals measuring 15mm — 25mm in length which also explains why it is difficult to achieve detail reproduction finer than 20mm with the gypsum-based materials.[18] The optical properties of these materials are another important factor to consider. Unlike the epoxy resin die material tested, the gypsum-based materials scattered light and required low-angle illumination to see details.
Attempts have been made towards achieving better mechanical and surface properties of die materials. Over the recent years, gypsum die stones have been compounded with resins to provide better abrasion resistance and lower expansion values.[3], [4], [5], [6], [7], [8], [9], [10], [11], [12], [13], [14], [15], [16], [17], [18], [19], [20], [21], [22] In this study, the resin modified gypsum products displayed surface detail reproduction of up to 21.86 µm which lies well within the acceptable range as prescribed by the American Dental Association Specification No.25 and ISO 14233:2003(E) for polymer-based die materials.[23], [24] This, more or less, proves the inability of resin compounded gypsum products to improve in the aspect of fine detail reproduction since they were as precise as Type IV gypsum alone.
Conclusion
Within the limitations of this study, the following conclusion can be drawn. Epoxy resin dies continue to reign amongst the materials studied, with the most accurate and precise reproduction of fine surface details. The epoxy resin material consistently replicated the 1.93 mm line in all the test samples. The lines were also easier to visualise. The resin-based gypsum materials and type IV gypsum replicated with the least detail among all the tested materials (21.86mm) while conventional Type V and synthetic gypsum showed intermediate reproducibility with replication of the 15.91 mm line.
Source of Funding
None.
Conflict of Interest
None.
References
- Marzouk MA, Simonton AL, Gross RD. Operative dentistry. Modern theory and practice. . 1997. [Google Scholar]
- Fernandes CP, Vassilakos N. Accuracy, detail reproduction, and hardness of gypsum casts produced from silicone impressions treated with glow discharge. J Prosthet Dent. 1990;70(5):457-64. [Google Scholar] [Crossref]
- Anusavice KJ, Shen C, Rawls HR. Phillips' Science of Dental Materials. . 2013. [Google Scholar]
- Bailey JH, Donovan TE, Preston JD. The dimensional accuracy of improved dental stone, silverplated , and epoxy resin die materials. J Prosthet Dent. 1988;59(3):307-17. [Google Scholar] [Crossref]
- Nomura GT, Reisbick MH, Preston JD. An investigation of epoxy resin dies. J Prosthet Dent. 1980;44(1):45-54. [Google Scholar] [Crossref]
- Schelb E, Cavazos E, Troendle KB, Prihoda TJ. Surface detail reproduction of type IV dental stones with selected polyvinyl siloxane impression materials. Quintessence Int. 1991;22(1):51-5. [Google Scholar]
- Kenyon BJ, Hagge MS, Leknius C, Daniels WC, Weed ST. Dimensional accuracy of 7 die materials. J Prosthodont. 2005;14(1):25-31. [Google Scholar] [Crossref]
- Vermilyea SG, Huget EF, Wiskoski J. Evaluation of resin die materials. J Prosthet Dent. 1979;42(3):304-11. [Google Scholar] [Crossref]
- Omana HM, Rinne VW, Truong TT. Compatibility of impressions and die stone material. Oper Dent. 1990;15(3):82-5. [Google Scholar]
- Fernandes CP, Vassilakos N. Accuracy, detail reproduction, and hardness of gypsum casts produced from silicone impressions treated with glow discharge. J Prosthet Dent. 1990;70(5):457-64. [Google Scholar] [Crossref]
- Aiach D, Malone W, Sandrik J. Dimensional accuracy of epoxy resins and their compatibility with impression materials. J Prosthet Dent. 1984;52(4):500-4. [Google Scholar] [Crossref]
- Shelb E, Mazzocco CV, Jones JD, Prihoda T. Compatibility of type IV dental stone with polyvinyl siloxane impression materials. J Prosthet Dent. 1987;58(1):19-22. [Google Scholar] [Crossref]
- Schelb E, Cavazos E, Troendle KB, Prihoda TJ. Surface detail reproduction of type IV dental stones with selected polyvinyl siloxane impression materials. Quintessence Int. 1991;22(1):51-5. [Google Scholar]
- Toreskog S, Phillips RW, Schnell RJ. Properties of die materials: a comparative study. J Prosthet Dent. 1966;16(1):119-50. [Google Scholar] [Crossref]
- Derrien G, Menn GL. Evaluation of detail reproduction for three die materials by using scanning electron microscopy and two-dimensional profilometry. J Prosthet Dent. 1995;74(1):1-7. [Google Scholar] [Crossref]
- Duke P, Moore K, Haug SP, Andres CJ. Study of the physical properties of type IV gypsum, resin containing, and epoxy die materials. J Prosthet Dent. 2000;83(4):466-73. [Google Scholar] [Crossref]
- Fan PL, Powers JM, Reid BC. Surface mechanical properties of stone, resin and metal dies. J Am Dent Asso. 1981;103(3):408-19. [Google Scholar] [Crossref]
- Paquette JM, Taniguchi T, White SN. Dimensional accuracy of an epoxy resin die material using two setting methods. J Prosthet Dent. 2000;83(3):301-6. [Google Scholar] [Crossref]
- Winkler MM, Monaghan P, Gilbert JL, Lautenschlager EP. Comparison of four techniques for monitoring the setting kinetics of gypsum. J Prosthet Dent. 1998;79(5):532-8. [Google Scholar] [Crossref]
- Winkler MM, Monaghan P, Gilbert JL, Lautenschlager EP. Freeze-drying and scanning electron microscopy of setting dental gypsum. Dent Mater. 1995;11(4):226-30. [Google Scholar] [Crossref]
- Ghahremannezhad HH, Mohamed SE, Stewart GP, Wienberg R. Effects of cyanoacrylates on die stone. J Prosthet Dent. 1983;49(5):639-85. [Google Scholar] [Crossref]
- Lindquist TJ, Stanford CM, Mostafavi H, Xie XJ. Abrasion resistance of a resin impregnated type IV gypsum in comparison to conventional products. J Prosthet Dent. 2002;87(3):319-22. [Google Scholar] [Crossref]
- . American Dental Association Specification No. 25 - 2000 for Dental Gysum Products. . 2000. [Google Scholar]
- . International Organization for Standardization (ISO) No. 14233:2003(E) for Dentistry - Polymer-based die materials. . 2003. [Google Scholar]
How to Cite This Article
Vancouver
Wankhade S, Wankhade J, Khalikar A, Mukhopadhyay P. Comparative evaluation of fine detail reproduction of six different die materials- An in-Vitro study [Internet]. Int J Oral Health Dent. 2021 [cited 2025 Oct 14];7(3):166-171. Available from: https://doi.org/10.18231/j.ijohd.2021.034
APA
Wankhade, S., Wankhade, J., Khalikar, A., Mukhopadhyay, P. (2021). Comparative evaluation of fine detail reproduction of six different die materials- An in-Vitro study. Int J Oral Health Dent, 7(3), 166-171. https://doi.org/10.18231/j.ijohd.2021.034
MLA
Wankhade, Sattyam, Wankhade, Jyoti, Khalikar, Arun, Mukhopadhyay, Pronoy. "Comparative evaluation of fine detail reproduction of six different die materials- An in-Vitro study." Int J Oral Health Dent, vol. 7, no. 3, 2021, pp. 166-171. https://doi.org/10.18231/j.ijohd.2021.034
Chicago
Wankhade, S., Wankhade, J., Khalikar, A., Mukhopadhyay, P.. "Comparative evaluation of fine detail reproduction of six different die materials- An in-Vitro study." Int J Oral Health Dent 7, no. 3 (2021): 166-171. https://doi.org/10.18231/j.ijohd.2021.034
